Cài đặt android 4.4 kitkat
Cho tới bây giờ chúng ta không thể phủ nhận được mức độ bao phủ của Android, và thực sự đây là một hệ điều hành mở tuyệt vời dành cho những nhà sản xuất điện thoại hay máy tính bảng. Chúng ta cũng biết là trước đây Android chỉ cài được trên smartphone & tablet, vậy còn các máy Laptop, tại sao không thử ? Thật đáng ngạc nhiên, nếu như bận đang cố gắng cài thử hệ điều hành free này cho bản thân bạn, thì ngay bây giờ có thể dành sự quan tâm cho đề án Android-x86. Chúng ta đã có windows x64, windows-x86 thì bâu giờ chúng ta cũng có Android-x86. Dự án này là một trải nghiệm mới mẻ, hoàn hảo & tuyệt vời nó hỗ trợ đầy đủ cho desktop & laptops chạy trên nền tảng x86.
Bạn đang xem: Cài đặt android 4.4 kitkat
Những gì bạn là được trên máy tính chạy Android Kitkat 4.4 x86 ? bạn có thể truy cập vào kho Google Play, tải về các uwsngd ụng Android apps, mua ứng dụng, và cài nó bình thường lên máy tính của bạn giống như là trên máy tính bảng hay laptop vậy , và lợi ích là nó sẽ chạy rất nhanh trên các thiết bị máy móc của bạn. Tuy là trên desktop, laptop thường không có cảm ứng hỗ trợ người dùng, nhưng Android-x86 sẽ hỗ trợ bạn cả trackpaads, bàn phím, và USB một cách đầy đủ. Dường như nó giống 1 trải nghiệm đầy mới mẻ và thú vị và nếu bạn có laptop đời cũ mà đang bỏ không thì có thể thử ngay cái này để lấy thêm nhiều trải nghiệm thú vị mới.
Thự ra dự án Android-x86 được ra đời cách đây từ vài năm, những người quan tâm công nghệ có thể họ đã đươc nghe được biết đến, thời kì đó là đề án được xây dựng cho Android ICS 4.0 cũng chạy trên máy tính. Kể từ đó Android -x86 được nâng cấp thành dự án Android trên máy tính chính thức. Và cho đến ngày hôm nay thì dự án về bản Android 4.4 kitkat được ra đời (sắp tới kế hoạch cũng sẽ là cho bản Lollipop 5.0). Để có thể cài được bản Kitkat này lên máy tính, laptop các bạn có thể tham khao hướng dẫn nguyên gốc dưới đây, có vấn đề trong quá trình cài đặt có thể để lại commnet phía dưới !
CÁC BƯỚC CÀI ANDROID 4.4 KITKAT TRÊN MÁY TÍNH
Part 1: Preparation
First, you’ll need to prepare your materials. You will need:
A USB stick with 1GB or more of storage space (I used an 8GB stick)A working computer to prepare your USB stick (Windows, Mac & Linux are all fine)A computer with an Intel x86 or x64 processor (could be the same computer as in step 4).Now we have to prepare our USB drive. Plug your drive into your computer, and format it to the FAT32 file system. You will lose all data on the drive, so be sure to back up anything of value before you perform this step!
Once the format has been completed, start UNetbootin.
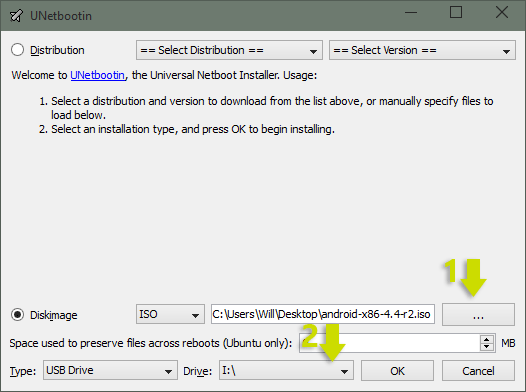
Click on the button with the ellipses near the bottom of the screen, and select the ISO file that you’ve downloaded. Then, select your USB drive from the dropdown menu at the bottom. Make sure your selection is accurate! When you’re ready press OK. Android-x86 will be copied to the USB drive, and the drive will be made bootable. When it’s complete, close UNetbootin and remove the USB drive from your computer.
Part 2: Boot from the USB drive
Now we need to boot into the USB drive from our target computer. Plug in the USB stick and turn on the computer (if it is already on, restart). In order to boot from the USB, you’ll need to make sure it is the first device that your computer attempts to boot from.
Xem thêm: Cài Đặt Theme Cho Win 7 - Hướng Dẫn Cài Đặt Theme Đẹp Cho Win 7
You can do this by pressing a key as the computer turns on. The key is different on different computers, but common keys include F1, F2, F10, F11, F12 and Delete. The hotkey will usually flash on the screen as the computer first boots, or can be Googled with the phrase “
Enter the BIOS and change your boot order so that your USB drive comes first. You may also need to make some changes to ensure the drive is recognised on newer devices – for example, I had to change to a ‘legacy boot’ instead of ‘UEFI’ on my laptop. Make your changes, then press F10 to save them and reboot.
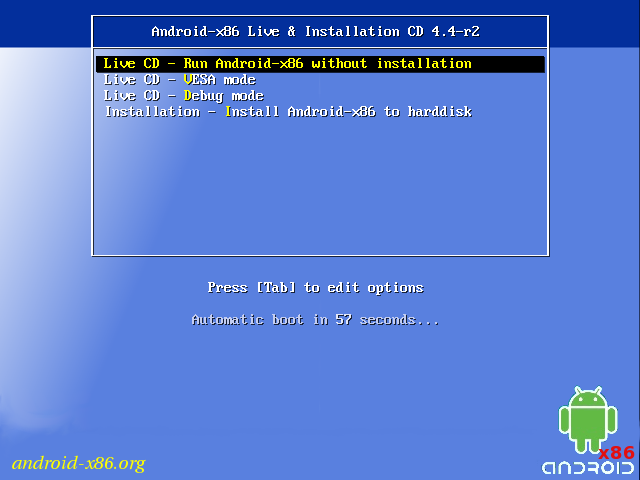
If all goes well, then you should see a screen like the one below. You will have several options here for installing Android-x86, but I recommend you choose ‘Live CD – run Android-x86 without installation’. This will let you try out the OS to see if it works well on your machine, without messing up your currently installed operating systems.
If you do decide to install, you’ll be asked to choose which drive you’d like to store Android-x86 on. Choose your drive, then choose the maximum size when asked how large you’d like to make the installation. This will provide more space for programs later on.
Whether or not you chose to install Android, after a few seconds / minutes you’ll be into Android proper!
Part 3: Android!
If all goes well, then you’ll see the Android logo, then a setup screen. As this is the first time you’re booting into Android-x86, you’ll need to go through the same setup process as on a real Android tablet. You’ll be asked to join a wireless network, sign into your Google account, and all the rest of it. With luck, your wireless card, keyboard and trackpad will all work during this stage. I had no issues here, so hopefully the same holds true for you.
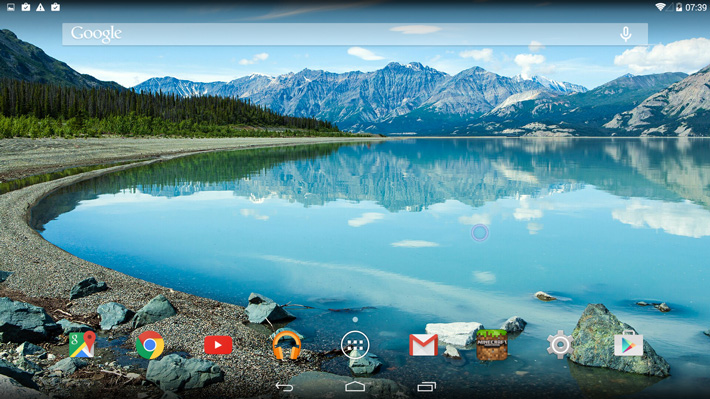
Once setup is completed, you’re free to explore the OS! Android-x86 comes with the Google Play Store, so you can access this and download any apps that you like. Some apps won’t be available for install (or will crash immediately), so it’s worth testing out your favourites.
I installed Chrome, Google Music and a few games, including Minecraft Pocket Edition. Not all apps and games work well, but those that I tried seemed OK!


